Tuesday, January 20, 2009

How to Reset Virtual Directories Exchange 2007


For a good reason you have decided to reset OWA virtual directory in exchange 2007 here are the steps to accomplish the goal. Performing same task in Exchange 2003 was more complicated in my opinion. You will find doing this on Exchange 2007 is pretty work.

If you wish to download the .DOC version please click here

Log into Exchange 2007 server Open EMS (Management Shell)

This will show you virtual directories on the CAS server called VMCAS1; change this to your CAS server name

CAS Server name: VMCAS01 (in this example)

  • Log into Exchange 2007 Server
  • Open EMS ( shell)
  • Type >>>>>>>Get-OwaVirtualDirectory -Server VMCAS1 ( Change the CAS server name to your own)

    This command will list the virtual directories for the VMCAS1 server

Get-OwaVirtualDirectory -Server VMCAS1


You can also type below command to see all servers and available directories

Get-OwaVirtualDirectory


Okay we will delete the, OWA virtual directory so goahed type the fallowing PS command into EMS as fallows

  • >>>>Remove-OwaVirtualDirectory -identity "VMCAS1\owa (default web site)"
  • Are you sure you want to perform this action? Press "Y" as in yes.


Remove-OwaVirtualDirectory -identity "VMCAS1\owa (default web site)"


  • Click Start
  • Run
  • InetMGR

Open IIS and verify the OWA directory is gone


You can also issue same PS command as fallows

  • >>>>Get-OwaVirtualDirectory -Server VMCAS1


Now we will put the OWA directories back to the same server

  • >>>>New-OwaVirtualDirectory -Name "VMCAS1\owa (default web site)"

New-OwaVirtualDirectory -Name "VMCAS1\owa (default web site)"


Type again to see the OWA directories are created

  • >>>>Get-OwaVirtualDirectory -Server VMCAS1


Oz ozugurlu

Oz ozugurlu MVP (Exchange)

MCITP (EMA), MCITP (EA) MCITP (SA),

MCSE (M+, S+) MCDST,

Security+, Server +, Project+


Monday, January 12, 2009

How to Export User mailboxes and its size into Excel spreadsheet

Task:

This is classic one and I am sure there are tons of examples on the internet. Report all mailboxes, names, and their size in exchange 2007. This task is very simple and easy to achieve with exchange 2007.

Solution:

Log into exchange server or management PC and open Exchange EMS (Shell). Either copy paste or type the fallowing command into EMS. Ps: Where ever you are running this cmdlet from there will be a file created as "MailReport.csv", open it with excel and format it as you wish.

Get-MailboxStatistics Sort-Object TotalItemSize -Descending select DisplayName,@{expression={$_.TotalItemSize.Value.ToKB()}},ItemCount export-csv MailReport.csv


Here is another one gives same report for per database (you need to change the below variables to your own)

  • Exchange server name: EXC07
  • Storage group name: SG01
  • Database name: SG01MB1

Get-MailboxStatistics -Database "Exc07\SG01\SG01MB1" select DisplayName, ItemCount, TotalItemSize export-csv -path e:\Reports\SG1.csv


This example, I have created folder on the e drive called "Reports". When you have the output open with Excel and format it as you wish

So the sum it up

  • Get-MailboxStatistics Sort-Object TotalItemSize -Descending select DisplayName,@{expression={$_.TotalItemSize.Value.ToKB()}},ItemCount export-csv MailReport.csv
  • Get-MailboxStatistics -Database "Exc07\SG01\SG01MB1" select DisplayName, ItemCount, TotalItemSize export-csv -path e:\Reports\SG1.csv


Thanks,

Oz

Oz ozugurlu

Oz ozugurlu MVP (Exchange)

MCITP (EMA), MCITP (EA) MCITP (SA),

MCSE (M+, S+) MCDST,

Security+, Server +, Project+

Sunday, January 11, 2009

How to configure Helpdesk mailbox and delegate send behalf of rights to Distribution Group

Scenario:

Business needs to create mailbox called helpdesk to keep track of new helpdesk e-mail. The helpdesk consist of several team members and they all need to monitor helpdesk mail box and also send mail as helpdesk mailbox while the members logged into their own workstation.

If you like to download this document please click here

Steps:

Use GUI EMC (Console) to create desired mailboxes.

  1. Helpdesk@telnet25.org ( mailbox)
  2. Tier1@telnet25.org (mail enabled Universal Distribution Group) the reason why we are creating DL is to make all helpdesk team members to make a member of this DL called Tier1. This will give us ability to assign proper right to the Group and simply manage the rest of the operations by adding users in it.

Reference

Adding mailbox permission "helpdesk" for user "Tier1" with access rights "'FullAccess'


Add-MailboxPermission helpdesk -AccessRights FullAccess -User Tier1


Removing mailbox permission "helpdesk" for user "Tier1" with access rights "'FullAccess'"


Remove-MailboxPermission helpdesk -AccessRights FullAccess -User Tier1


Adding Active Directory permission "helpDesk" for user "Tier1" with access rights "'all'".


Add-MailboxPermission helpdesk -AccessRights Sendas -User Tier1


Remove-MailboxPermission helpdesk -AccessRights Sendas -User Tier1


Add-ADPermission helpDesk -ExtendedRights all -User Tier1


Removing Active Directory permission "helpDesk" for user "Tier1" with access rights "'all'".


Remove-ADPermission helpDesk -ExtendedRights all -User Tier1


Adding Active Directory permission "helpDesk" for user "Tier1" with access rights "'send-as'".

This also adds send as rights on the Helpdesk mailbox for Tier 1 Group. Initially if you go to exchange server and open EMC, find the Helpdesk mail enables user account, right click, pick send as permissions and assign it to Tier1 Group, you will notice the AD object will get the same effects and send as right will be give to Tier1 group on Helpdesk object. Below command achieves same results from EMS.


Add-ADPermission helpDesk -ExtendedRights send-as -User Tier1


Removing Active Directory permission "helpDesk" for user "Tier1" with access rights "'send-as'".

This also removes send as rights on the Helpdesk mailbox for Tier 1 Group


Remove-ADPermission helpDesk -ExtendedRights send-as -User Tier1


Finally we will set Grand Send on Behalf right to Tier1 group for helpdesk mailbox.


Set-DistributionGroup -Identity Tier1 -GrantSendOnBehalfTo Helpdesk

Another example assigning Grand Send on behalf right to another mail enabled user.


Set-Mailbox –ID HelpDesk –GrantSendOnBehalfTo Someuser


Remove-MailboxPermission -ID helpdesk -User Tier1 -AccessRights FullAccess


Step one:

Make sure you have already created helpdesk mail box as well as mail enabled group called Tier1 (Change the names as you wish). Also make sure you have added appropriate members into Tier1 mail enabled group.

  • Open EMS
  • Type or copy & paste below command.
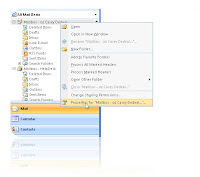
  • As you can see after this command is issues, members of Tier1 Group will be able to bring helpdesk mailbox as additional mailbox on to their outlook shown below.


Add-MailboxPermission helpdesk -AccessRights FullAccess -User Tier1


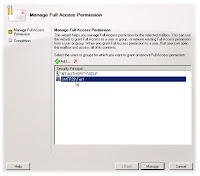
Adding Mailbox Permission, we mailbox called Helpdesk and Mail Enabled Universal Security Group called Tier1. The command below will add Full access rights to Helpdesk for Tier1 Mail Enabled Universal Security Group.

Note: If your account is member of Tier1 Group you will be able to log in to outlook as yourself and by going properties of your mailbox (where your name appears within the outlook) and add Helpdesk mailbox as second mailbox to your own, so that you can monitor it.

This is also useful to troubleshoot a user problem, assign the rights to yourself and Plug the trouble mailbox to your own and when you are done remove the rights.


  • Properties
  • Advance
  • Advance
  • Click Add
  • Type the name of the mailbox (Helpdesk)
  • Click Ok two times to get out


    Remember this does not grand the Tier1 Group send as helpdesk mailbox and most likely the person who monitors this mailbox will need ability to "send as" Helpdesk while they logged in as themselves. If you try to send mail as if coming from helpdesk you will receive


"You don't have the permission to send the message on behalf of the specific user"


Step 2:
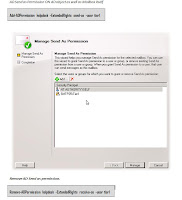
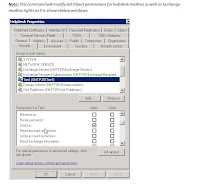
AD Send as Permission ON AD object as well as Mailbox itself


Add-ADPermission helpdesk -ExtendedRights send-as -user tier1


Remove AD Send as permission.


Remove-ADPermission helpdesk -ExtendedRights receive-as -user tier1


Note: This command will modify AD Object permissions for helpdesk mailbox as well as Exchange mailbox rights as it is shown below windows.


To see AD rights from command line


Get-ADPermission HelpDesk fl


Step 3

Easiest way is to login to any workstation as Helpdesk. Configure Outlook mapi profile for HelpDesk.

Within the outlook

  • Tools
  • Options
  • Delegates
  • Click Add
  • Add Tier1 Group and give Proper permissions


Note:

Note: remember we are assigning Send behalf rights to a mail enabled Group in this example

  • Use following cmdlet to assign Send behalf rights to a mail enabled Group
  • Set-DistributionGroup -Identity Tier1 -GrantSendOnBehalfTo Helpdesk

  • Use below cmdlet to verify that the mailbox permissions
  • Get-MailboxPermission -Identity HelpDesk -User Tier1

Oz ozugurlu

Oz ozugurlu MVP (Exchange)

MCITP (EMA), MCITP (EA) MCITP (SA),

MCSE (M+, S+) MCDST,

Security+, Server +, Project+

Blog: smtp25.blogspot.com

Blog: telnet25.wordpress.com

Wednesday, January 7, 2009

Forefront SharePoint Virus upload Test


From one of the recent project I was giving task to document what user experience would look like, when users upload the "effected document" to one of the websites within share point, MOSS after forefront security installation. I must be honest I don't have much deep dive with SharePoint, but Installation forefront security for share point was very straight forward and easy. I am including MS best practices link in this article. Simulation of user experience ahead of time was fun and I used hand from close body Pushpendu Biswas. MOSS master (- : I could not have done it easily without him, so thanks a bunch to Push again as always.

Here are the notes and hope helps someone out there.

I have full document posted here

If you prefer the Doc copy of it, please e-mail me with your preferred e-mail address I will be more than happy to e-mail it back.

Forefront SharePoint

  • Install Forefront security to all MOSS servers in the environment, it needs to be installed all of them
  • Follow MS best practices, link included on the bottom of this article.
  • Verify that antivirus has been configured in MOSS:
  • In Central Administration navigate to Operations
  • In the Security Configuration section select Antivirus
  • Make sure that Scan documents on upload and Scan documents on download are checked

Preparation

  • Open your notepad and copy and paste this and save it as "Virus_Test.txt"
  • Open your MOS and go to any site
  • Click on shared documents
  • Click Upload, browse to same file, click open and ok to upload it to the site
  • You will receive below warning


Virus Found

"SMTP25.org_Virus_Test.txt" contains the following virus: "VIRUS= EICAR_test_file (VBuster,Kaspersky5,AhnLab,Microsoft,Sophos); Tagged ID: B08F17DD_DF65_4B87_9364_B0EF1CF11205" .

This file cannot be saved to the document library. If you want to save this file to the document library, clean the file using alternative virus scanning software and try saving it again.

Troubleshoot issues with Windows SharePoint Services.


Here is Virus file, Copy and paste this into notepad and save it on the local hard drive (MOSS)

This Virus file to be uploaded into one of the sites to test the Forefront functionality.


X5O!P%@AP[4\PZX54(P^)7CC)7}$EICAR-STANDARD-ANTIVIRUS-TEST-FILE!$H+H*


Thanks,

Oz ozugurlu

Oz ozugurlu MVP (Exchange)

MCITP (EMA), MCITP (EA) MCITP (SA),

MCSE (M+, S+) MCDST,

Security+, Server +, Project+


Friday, January 2, 2009

Exchange Free / Busy


The Free/Busy information could not be retrieved when we access from Ms Outlook 2007. The environment has Mailbox server, CAS server and ISA 2006.

Let's take a look at the free busy information on Exchange 2003 first. What is a free busy data? It is the data within outlook shows users published availability information based on their Calendar information. (Individual schedule)

Exchange 2000&2003 FB

In exchange 2000/2003 Free Busy is stored in dedicated public folder called SCHEDULE+FREE BUSY. This folder also contains several subfolders for each administrative group. When user publishes FB data (outlook calendar appointment, etc) this information gets stored suitable FB subfolder

What happens if this folder is missing or corrupted in exchange 2003, users will get error indicating "Unable to update public free/busy data

http://support.microsoft.com/kb/284200

Exchange 2007 FB

What change in Exchange 2007, where is free /busy being stored? The new service called Availability Service in exchange 2007 handles the Free/Busy information. The free/busy process works by downloading information directly from the calendar in the mailbox. The FB information read from the client, so client is responsible for generating it.

Exchange 2007 will not store FB data on the public folders and eliminated unnecessary replication in exchange environment. The service deployed via CAS server role, the outlook client 2007 will discover the availability service via Autodiscover.

  • Remember outlook client will use Autodiscover service to use Availability service and retrieve free, busy information from CAS server.
  • Outlook 2007 employs availability service, whereas outlook 2003 clients still use public folders.
  • Availability service has ability to contact legacy exchange server, public folder and retrieve FB information

Here is excelled post explaining FB generation, after reading the post you will quickly realize the client will publish the FB information to the Server and things are changed in exchange 2007.

http://msexchangeteam.com/archive/2006/08/04/428597.aspx

What does Exchange 2007 Availability Service Do?

http://msexchangeteam.com/archive/2006/10/23/429296.aspx

Troubleshooting Free Busy in Exchange 2007

If free/busy is not working properly in exchange 2007, Autodiscover service or the Availability service needs to be investigated for the problem.

Troubleshoot the auto discovery connectivity on outlook 2007, turn on diagnosing login and investigate "olkdisc.log"

  • Logon to Outlook to troubleshoot the issue
  • Click Tools, Options, click the other tab, click Advanced Options.
  • Select Enable logging (troubleshooting), click ok.
  • Restart Outlook 2007, and then try to view free/busy information for another user.
  • In Microsoft Windows, click Start, click Run, and then type %temp%.
  • In Windows Explorer, open the olkdisc.log file and locate the files in the olkas directory.
  • The information that is contained in this directory can frequently provide information about which service is not functioning correctly.

Exchange Management Shell to test the Availability service

Open EMS (Exchange management Shell)

Test-OutlookWebServices -id:user1@smtp25.org -TargetAddress: user2@smtp25.org


Note:

I have seen troubles when single certificate is being used for exchange 2007 server with CAS and ISA 2006. The external published URL webmail.myCompany.com is mapping the ISA virtual IP address and it is getting routed to the CAS server IP, trough the ISA.

The name in the certificate wont math the CAS server name and therefore the warning message will appear when starting Outlook 2007 and then connect to a mailbox that is hosted on an Exchange 2007-based server: "The name of the security certificate is invalid or does not match the name of the site"

After following the steps explained in the KB 940726, make sure the record publish for outside Webmail.MyCompony.com is pointing to internal CAS server

http://support.microsoft.com/kb/940726

The clients who will connect from outside will go through Firewall, ISA, and CAS server. Internal clients will connect to CAS server directly. If you do have more than one CAS server to achieve round robin behavior and bring some redundancy for internal OWA users, create multiple A records for each CAS server, as

  • Webmail.MyCompany.com=10.10.10.15 (CAS01)
  • Webmail.MyCompany.com=10.10.10.16 (CAS02)
  • Webmail.MyCompany.com=10.10.10.17 (CAS03)

Make proper changes on the IIS each CAS server (redirection to OWA folder). The Form base authentication won't be available for internal OWA users since turning it on will break the ISA configuration.

To see the Directories

Get-AutoDiscoveryVirtualDirectory FL


Set-ClientAccessServer -Identity EXCCAS01 -AutodiscoverServiceInternalUri https://webmail.smtp25.org/autodiscover/autodiscover.xml


Set-WebServicesVirtualDirectory -Identity "EXCCAS01\EWS (Default Web Site)" -InternalUrl https://webmail.smtp25.org/ews/exchange.asmx


Set-OABVirtualDirectory -Identity "EXCCAS01\oab (Default Web Site)" -InternalUrl https://webmail.smtp25.org/oab

Troubleshooting Free/Busy Information for Outlook 2007

Follow the link below

http://technet.microsoft.com/en-us/library/bb397225.aspx

Note:

There is also way to force outlook 2007 to look for FB information on the PF folders

HKEY_CURRENT_USER\Software\Microsoft\Office\12.0\Outlook\Options\Calendar
Value Type: DWORD
Value Name: UseLegacyFB
Values:0 or not set (default behavior which is to use the Availability Service) or 1 (use Public Folder based Free/Busy information)


Oz ozugurlu MVP (Exchange)

MCITP (EMA), MCITP (EA) MCITP (SA),

MCSE (M+, S+) MCDST,

Security+, Server +, Project+

Blog: http://smtp25.blogspot.com/

Blog: http://telnet25.wordpress.com/

Thursday, January 1, 2009

Active Directory Explorer & ADSIEDIT


This incredible tool seems to me advance version of ADSIEDIT.msc. I am including the description as it is on the TechNet site on the bottom as well as link to it. Connecting domain is very easy and straight forward and being able to take snapshots and work on it is very cool. On the lunch menu. Download the ADE from this link.

Connecting

  • Connect to: Domain, or DC name
  • User name: Domain\Username
  • Password: password

Take a snapshoot

  • Click file
  • Create snapshoot
  • Enter description
  • Specify the path (make a folder called snapshoot and save it in there)
  • (C:\SnapShoot\smtp25-010109)

Open the snapshoot

  • File
  • Connect
  • Enter the path for previously snapshot to load
  • C:\SnapShoot\smtp25-010109

This is great for collection information, security auditing, training and etc snapshoot are read only

http://technet.microsoft.com/en-us/sysinternals/bb963907.aspx

Download ADE

Active Directory Explorer (AD Explorer) is an advanced Active Directory (AD) viewer and editor. You can use AD Explorer to easily navigate an AD database, define favorite locations, view object properties and attributes without having to open dialog boxes, edit permissions, view an object's schema, and execute sophisticated searches that you can save and re-execute.

AD Explorer also includes the ability to save snapshots of an AD database for off-line viewing and comparisons. When you load a saved snapshot, you can navigate and explorer it as you would a live database. If you have two snapshots of an AD database you can use AD Explorer's comparison functionality to see what objects, attributes and security permissions changed between them.

Best,

Oz ozugurlu MVP (Exchange)

MCITP (EMA), MCITP (EA) MCITP (SA),

MCSE (M+, S+) MCDST,

Security+, Server +, Project+

Blog: http://smtp25.blogspot.com/

Blog: http://telnet25.wordpress.com/